Creating intelligent apps with Computer Vision

After some experimenting with SkiaSharp, I came up with the idea to build a game like Draw It. Normally you draw something and someone needs to guess what you’ve drawn. This time I wanted to take a bit of a different approach. I wanted to draw something with SkiaSharp and put Computer Vision to the test!

Computer Vision is (a small) part of the Cognitive Services that Microsoft offers. The Cognitive Services allow developers without knowledge of machine learning to create intelligent applications. There are 5 different categories of cognitive services (at the moment of writing):

  • Vision: Image and video processing.
  • Knowledge: Mapping complex data to use for recommendations or semantic search.
  • Language: Process natural language to recognise sentiment and determine what users want.
  • Speech: Speaker recognition and real-time translation.
  • Search: More intelligent search engine.

The categories have a lot more to offer than described above. If you want to know more, please visit the Cognitive Services website. There is a 30-day trial available if you want to try it!

Computer Vision 

Computer Vision API is all about analysing images and videos. After sending an image or video, the API returns a broad set of metadata on the visual aspects of the file.  Besides telling you what’s in the picture, it can also tell who’s in the picture. Because it’s not trained to recognize everybody on this planet, this will only work with celebrities. If you’re not recognized by Computer Vision, it can still tell a lot about your picture. It will add tags, captions and even guess your age! It’s really fun to experiment with!

Computer Vision also supports Optical Character Recognition (OCR) what can be used to read text from images. OCR is very useful when you’re building apps that need to interpret paper documents. Handwritten text are still in preview.

If you want to test if Computer Vision suits your needs, you can give it a try on the website without having to code a single line. This demo will only work for basic scenarios (upload an image), if you want to use the more advanced features (like real-time video), I’d suggest you try the API directly.

Getting started

Using Cognitive Services is pretty straightforward because all of the magic is available through REST API’s. For this post I will focus on the Computer Vision API, but the other APIs work in a similar way. You can use the API’s with the following steps:

  1. To start using Cognitive Services you can create a trial account on the website. Click the “Try Cognitive Services for free” button and then click “Get API Key” for the Computer Vision API. After signing in with your account you will get an API key that allows you to create 5000 transactions, limited to 20 per minute. Note: the trial is limited to the westcentralus API (https://westcentralus.api.cognitive.microsoft.com/vision/v1.0).
    If you want to implement Cognitive Service in your production environment, you can obtain an API key from the Azure Portal. Therefor you need to create an Cognitive Services resource of the type you want to use (for example: Computer Vision API). When the resource is created, you can get your keys from the Quick Start -> Keys.
  2. Because Computer Vision is exposed as an REST API, you can call it from your app using HttpClient. Instead of creating your HttpClient, you can also use the NuGet package to make your calls to the Computer Vision API.
    Note: In most cases you don’t want to make the calls directly from your app, but call the Cognitive Services from your server. This will prevent users from stealing your API key (and burning your Azure credits) when they decompile your app or intercept your calls.
  3. After adding the Microsoft.ProjectOxford.Vision to your backend or frontend, you will be able to use Computer Vision with a few lines of code:
    // If you're using a trial, make sure to pass the westcentralus api base URL
    var visionClient = new VisionServiceClient(API_Key, "https://westcentralus.api.cognitive.microsoft.com/vision/v1.0");
    VisualFeature[] features = { VisualFeature.Tags, VisualFeature.Categories, VisualFeature.Description, VisualFeature.ImageType, VisualFeature. };
    var result = await visionClient.AnalyzeImageAsync(stream, features.ToList(), null); 

    First we create an VisionServiceClient object with an API key and a base URL. Trial keys only work with the WestCentralUS instance and therefor I’m also passing the BaseUrl. When you’ve created a client, you can call AnalyzeImageAsync. This function takes in a Stream (which contains the image) and a list of VisualFeatures. The VisualFeatures specify what you want Computer Vision to analyse. If you prefer to use the HttpClient instead of the NuGet package, I’d recommend the video where René Ruppert explains how to use HttpClient to consume Cognitive Services.

Results

Unfortunately my drawing skills are not good enough for Computer Vision to recognise (with great certainty) what I was drawing. Although it was not sure what I was drawing, it suggested “Outdoor house” with a accuracy of 0.1875. An other tag Computer Vision suggested was “Clock” and I think that’s because the sun looks like a clock.

If you want to give your drawing skills a shot, the code of my experiment is on GitHub. For the drawing part of the application I’ve used some code snippets from the Xamarin.Forms samples. Besides this sample app, Xamarin has a lot of great sample apps on their GitHub.

If you want to learn more about the Computer Vision API or Cognitive Service, make sure to check out the related links below. If you have any questions or suggestions, please don’t hesitate to contact me on Twitter.

Related links:


Drawing with SkiaSharp in Xamarin.Forms

Where most people try to find suitable tools, services and frameworks for the app they are going to build, for me it’s often the other way around. I’m often looking for app ideas to experiment with specific tools, services or frameworks. This time I wanted to give SkiaSharp a try!

In 2005 Google acquired the 2D graphics engine called Skia. The engine is open-source and nowadays used in Google Chrome, Chrome OS, Android, Mozilla Firefox, Firefox OS, and many other products. To extend the use of this engine to the .NET world, Xamarin created a binding called SkiaSharp. This binding can be used in Windows Forms, WPF, UWP, iOS, Android, tvOS, Mac, Xamarin.Forms. SkiaSharp works similar across platforms, but each platform has a few specific classes. This blogpost will focus on Xamarin.Forms since this covers a wide range of platforms and it doesn’t contain a 2D graphics engine itself.

Getting started

  1. First, you need to add the SkiaSharp.Views.Forms NuGet package to your Xamarin.Forms PCL (or .netstandard) project and platform specific projects. This package depends on the SkiaSharp package, and therefor this NuGet package will be added as well.
  2. After adding the package, you are able to use the SkiaSharp Views in your Xaml or in your code. If you want to use SkiaSharp in your Xaml, you first need to define the namespace:
    xmlns:skia="clr-namespace:SkiaSharp.Views.Forms;assembly:SkiaSharp.Views.Forms"
    

    To use the Views in your code you only need to add the same namespace as a using.

  3. The Views.Forms namespace contains a View called SKCanvasView. As the name suggests, this View will create a canvas to draw on. It’s not possible to draw directly onto the SKCanvasView, but the view exposes an EventHandler called PaintSurface. This handler is called when the canvas needs to be (completely) re-drawn and contains an (very important!) argument of type SKPaintSurfaceEventArgs. Typically the event will be raised during initialisation or on rotation. It’s also possible to trigger the event manually by calling the InvalidateSurface() on the SKCanvasView. Registering your event handler can be done in code or in Xaml. In Xaml this can be achieved with the following code:
    <skia:SKCanvasView PaintSurface="Handle_PaintSurface"/>
    

    With this Xaml you tell the SKCanvasView to call the Handle_PaintSurface in your code-behind when the canvas needs to be (re-)drawn. The argument contains a property Surface which on his turn contains a property called Canvas. On this Canvas object we can start drawing!

  4. The basics of drawing are pretty simple. You need to specify the coordinates of the object you want to draw and you need to pass an instance of type SKPaint. The SKPaint object defines how your object will look. There are 3 types of styles:
    • Fill: Specify on how to fill an object like for example a circle.
    • Stroke: Specify on how thick and what color the drawing of lines will be.
    • StrokeAndFill: Specifies the styling of the lines drawn and how to fill that object.
  5. A few examples of drawing a simple shape:
    SKPaint blueFill = new SKPaint { Style = SKPaintStyle.Fill, Color = SKColors.Blue };
    SKPaint blackLine = new SKPaint { Style = SkiaSharp.SKPaintStyle.Stroke, StrokeWidth = 10, Color = SKColors.Black };
    
    // Draws a line from 0,0 to 100,100
    canvas.DrawLine(0, 0, 100, 100, blackLine);
    
    // Draws a rectangle left=0, top=0, right=300, bottom=150
    canvas.DrawRect(new SKRect(0, 0, 300, 150), blueFill);
    
    // Draws a circle at 100,100 with a radius of 30
    canvas.DrawCircle(100, 100, 30, blackLine);


Beyond the basics

SkiaSharp has a lot more to offer, but that’s way to much to cover in one blogpost. If you want to take it a step further, the following topics might be interesting:

  • Bitmaps allow you to use images in your Canvas.
  • With Transformations you can modify the coordinates or size of your objects. This is often used in combination with animations. At this moment you can use the following transformations: Translate, Scale, Rotate and Skew.
  • Save() allows you to save the current state of the canvas. With Restore() you can return to the last saved state. This is very useful when you’ve applied Transforms on your Canvas and you want to go back to the previous state.
  • Animations can be created by calling InvalidateSurface(). This will trigger the PaintSurface event that you can use to apply your changes to the canvas.
  • In a lot of cases you might want to write something on your Canvas and therefor DrawText() was created. Skia allows you to draw text with a lot of styling options.
  • If you want to draw a line from point to point (and so on), SKPath might fulfill your needs. Paths can be customised (visually) pretty easy. You can also create curves to smoothen your path.
  • Creating a gradient can be easily achieved with the SkShader class. You can combine this with some Noise to create a nice texture.

Conclusion

Drawing with SkiaSharp is pretty easy and fun, especially when using the Xamarin Live Player. The Live Player allows you to edit your code and instantaneously see your changes. This improves the speed of coding a lot!

SkiaSharp is available for a wide range of platforms, which makes it very powerful. Although you can share a lot of code, you always have to keep in mind what devices sizes and device forms you are developing for.

The documentation on the Xamarin website is great and they also have a lot of samples. I’ve created a sample project myself which contains the basics of drawing with SkiaSharp. The result is shown on this image (only tested on iPhone 8 and Nexus 5). You can find the code on GitHub. Feel free to improve the drawing by creating a PR!

If you have any questions, don’t hesitate to contact me through the contact form or on Twitter.

Related links:


Setting up a Xamarin build with Cake

There are a lot of different ways for setting up your continuous delivery pipeline these days. Platforms like Mobile Center and Bitrise offer a complete solution that can be configured very easily. Another solution that’s gaining more popularity is Cake Build. Cake Build also has a lot to offer, but in quite a different way.

Cake is cross-platform build automation system, based on C#.  It’s open source (on GitHub) and became part of the .NET foundation last year. The possibilities with Cake are endless because you can use all the features that C# has to offer. You can even consume NuGet packages in your build script. Cake also has a few siblings called Jake, Make, Rake and Fake which are similar, but use other languages.

When setting up your build with Cake, you need to create a build file which contains your build steps, written in C#. Cake comes with a lot of default build tasks for you to use in your pipeline. A great advantage of having your configuration in a file, is that you can easily move to an other system or environment without having to reconfigure your entire pipeline. Adding this file to your source repository will also enable versioning on your build script, awesome! Cake build tools work on Windows, Linux and on Mac OS X.

To make the writing of your build scripts a lot more pleasant, there is a Visual Studio Code add-in and an Visual Studio add-in. The add-ins integrate Cake in your IDE and allow you to create the required files with a few clicks. Code completion, Intellisense (recently announced) and syntax highlighting are also great features that the add-in has to offer. If that’s not enough, and your build is still failing for some vague reason, you can even debug your build script to find the issue!

Getting started

When setting up your first Cake build, there are 3 files of importance:

  • Bootstrapper file: will download Cake.exe and all it’s dependencies using a PowerShell script for Windows (build.ps1) or a bash script for Mac OS X/ Linux (build.sh). When Cake is already installed with all it’s dependencies, the Cake.exe can also be called directly.
  • Build steps: This file (by default called “build.cake“) contains all the steps that need to be executed for the build to succeed. The build script can be written in a C# Domain-specific language. Because it’s written in C#, you are able to use all the C# features in your script!
    The execution order of the steps can be manipulated by making steps depend on each other, or by setting criteria. This can be achieved by using extensions methods.
  • NuGet packages: All the dependency required for the build to run are defined in a packages config file (tools/packages.config). The listed dependencies will be installed in the tools folder. An example dependency might for example be a unit test runner.

After specifying your build steps and dependencies, you can kick off the build by running the bootstrapper file:

Mac & Linux:

sh build.sh

Windows:

PS> .\build.ps1

Don’t hesitate to give Cake Build a try, you can run it side by side with your current build without modifying your project! My working example is also available on GitHub.

Cake.Recipe
To ease the re-use of build scripts, Cake.Recipe was introduced. Cake.Recipe is a set of build tasks which can be consumed through NuGet. For more info, please visit their website.

Related links:

Code sharing with GIT submodules

When developing software, sharing your code can save up a lot of time and decrease redundancy. To really make this work for your team, it is of great essence to choose a fitting code sharing strategy.

One way to achieve this is by using NuGet to distribute and consume the code in packages. NuGet makes publishing, consuming (a specific version), updating and managing dependencies easy. Although NuGet publishing can be automated, you still need to publish every time when you make a small change in your shared code. When your code is still heavily under construction, this might be less efficient.

These inconveniences were taken in consideration by GIT, and therefor GIT submodules were developed. With GIT submodules it’s possible to clone a (sub)repository in your working repository. This will create a subfolder in your repository where you can use the code from the external repository. Changes made in the submodule are not tracked to the working repository, only to the submodule repository. GIT submodules are especially useful when sharing code across multiple applications. If you only want to share code across platforms, it’s probably more efficient to work in the same repository.

With GIT submodules you’re able to specify in what directory your submodule lives and what version (points to a specific commit) of the shared code you want to use. To explain this in more detail, I will use an example where the (Xamarin) “SubmoduleApp” wants to make use of a “Shared” GIT repository.

  1. First, you need to clone the repository which contains the app (git clone https://github.com/basdecort/SubmoduleApp.git):
  2. After you cloned the source code of the app you are working on, you can add your submodule. Make sure you navigated to the correct folder (and switched to the correct branch) before adding the submodule, then run “git submodule add {repoUrl}”:
  3. When this operation finishes, you probably notice that the submodule was cloned into the specified subdirectory. Although this process created a lot of files in our working directory, GIT only detected 2 file changes. We can verify this by running “git status”: 
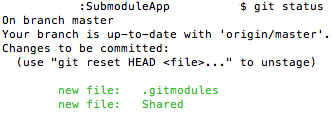
All of the cloned files are tracked to the shared repository and therefor aren’t labeled as new. The two files (.gitmodules & Shared) that are added to the SubmoduleApp repository contain information about the submodule:
    • .gitmodule : information about the remote repository of the module.
    • Shared : this file will point to a specific commit of the submodule. The name of the file depends on the name of the directory of your submodule.By changing the hash, you will point to a different version (commit) of the shared repository.
  4. To make sure everyone uses the submodules in the same way, you should make sure to commit and push these files to the root repository.
  5. At this point you’ve successfully created a submodule! If you followed the exact steps as mentioned above, you end up with the following folder structure:With this folder structure it’s fairly easy to create a reference from the TodoPCL.sln to your Shared project and keep your code completely separated.
  6. After making some changes, just navigate to the correct repository folder (Shared or Todo) and commit your changes from there like you did before. Changes will be applied to the correct repository.

You can find this example on GitHub as well. If you don’t like to work in a terminal, I’d recommend SourceTree. SourceTree is a great tool for working with GIT submodules and is available for Windows and Mac.

Related links:

Talking Bluetooth (Low Energy) with Xamarin

With the rising popularity of IoT (Internet of Things), it becomes more common that you need to communicate with hardware. In most cases you can accomplish this with network connectivity, but you might want to consider Bluetooth Low Energy (BLE) as well. As the name suggests, BLE uses a lot less energy in comparison to classic Bluetooth. Less energy consumption means that it’s possible to use smaller (and portable) batteries what might be very useful for IoT devices. When deciding if BLE suites your needs, you should take a few things in consideration:

  • Bandwidth: Bluetooth is less suitable for transmitting large sets of data, especially BLE.
  • Costs: in comparison to network adapters, bluetooth is more affordable.
  • Range: the range of your device really depends on the bluetooth device and version that is used by the hardware and the smartphone/tablet. The environment might also impact the range. At a maximum you can reach 100 meters, but the average will be around 15 meters.
  • Power consumption: you can use BLE to save energy, but this will limit the throughput. If you are transferring small packages this might be interesting. The classic way of bluetooth communication is also less consuming than network connectivity.

Instead of writing the bluetooth code for every platform, you can choose to use a plugin that provides an abstraction layer so it’s possible to access BLE from shared code. At the time of writing, I find Bluetooth LE Plugin for Xamarin the best pick for the job. The plug-in is easy to implement and is continuously getting updates. If you want to use classic bluetooth you might want to look into some other plugins. in this post I will focus on Bluetooth LE Plugin for Xamarin.

When working with BLE, there are 3 (most important) different bluetooth abstraction layers:

  • Services: A service contains one or more characteristics. For example, you could have a service called “Heart Rate service” that includes characteristics such as “heart rate measurement.” Each service has it’s unique pre-defined 16-bit or 128-bit UUID.
  • Characteristics: A characteristic is some kind of endpoint for a specific part of the service. Just like a service, the characteristic also has a UUID. Characteristics support a range of different interactions: read, write, notify, indicate, signedWrite, writableAuxilliaries, broadcast.
  • DescriptorsDescriptors are defined attributes that describe a characteristic value. For example, a descriptor might specify a human-readable description, an acceptable range for a characteristic’s value, or a unit of measure that is specific to a characteristic’s value.

Now, let’s dive into some code samples! To give you a taste of what the plugin has in store for you, some snippets:

Scan for BLE devices (advertisements)
The Adapter class makes it possible to detect devices in the surrounding area. You can simply get an instance of the adapter and start scanning with the following code:

 var adapter = CrossBluetoothLE.Current.Adapter;
adapter.DeviceDiscovered += (s,a) =+ deviceList.Add(a.Device);
await adapter.StartScanningForDevicesAsync(); 

Connect to device
When you’ve found the device you want to connect to, you are able to initiate a connection with the device. After connecting successfully to a device you are able to get the available characteristics and start sending requests or start retrieving notifications from the device. When the bluetooth device doesn’t receive any requests for a specific period (may differ per device), it will disconnect to save battery power. After getting a device instance (with the previous sample), it’s fairly easy to setup a connection:

 try
{
    await _adapter.ConnectToDeviceAsync(device);
}
catch(DeviceConnectionException e)
{
// ... could not connect to device
}

Note: a device scan is only necessary when connecting to the device for the first time. It’s also possible to initiate a connection based on the UUID of the device.

Get services, characteristics, descriptors
As described above, a service is the first abstraction layer. When an instance of a service is resolved, the characteristics of this specific service can be requested. The same goes for a characteristic and his descriptors. On a characteristic you can request the descriptors.

The different abstraction layers can be requested in a similar way, GetAll or GetById:

// Get All services and getting a specific service
var services = await connectedDevice.GetServicesAsync();
var service = await connectedDevice.GetServiceAsync(Guid.Parse("ffe0ecd2-3d16-4f8d-90de-e89e7fc396a5"));

// Get All characteristics and getting a specific characteristic
var characteristics = await service.GetCharacteristicsAsync();
var characteristic = await service.GetCharacteristicAsync(Guid.Parse("37f97614-f7f7-4ae5-9db8-0023fb4215ca"));

// Get All descriptors and getting a specific descriptor
var descriptors = await characteristic.GetDescriptorsAsync();
var descriptor = await characteristic.GetDescriptorAsync(Guid.Parse("6f361a84-eeac-404c-ae48-e65b9cba6af8"));

Send write command
After retrieving an instance of the characteristic you’re able to interact with it. Writing bytes for example:

await characteristic.WriteAsync(bytes);

Send read command
You can also request information from a characteristic:

var bytes = await characteristic.ReadAsync();

Pretty easy, right? To get you started, you can find an example project on the Bluetooth LE Plugin GitHub page. Although this seems pretty simple,  I’ve experienced some difficulties in making it rock solid. Some tips to improve your code:

  • Run bluetooth code on main thread.
  • Don’t scan for devices and send commands simultaneously, also don’t send multiple commands simultaneously. A characteristic can only execute one request at a time.
  • Adjust ScanMode to suit your use case.
  • Don’t store instances of characteristics or services.

Related links:

Microsoft Build: VS4Mac

Last week I travelled to Seattle to attend the Microsoft Build conference. On the first day of the conference there were a lot of cool announcements related to AI, IoT, Azure and more, but Xamarin wasn’t mentioned at all. Slightly related to Xamarin development was the release of Visual Studio for Mac.

Together with my colleague Marco, I’ll cover announcements made at the Microsoft Build conference in a series of blogpost. You can also read these posts on his blog.

In november Microsoft announced the availability of Visual Studio for Mac (VS4Mac) at Microsoft Connect();-event. In the beginning, MonoDevelop was the IDE to develop C# on a Mac, which later converted to Xamarin Studio (XS). But since the Build-conference this week, VS4Mac has gone GA which made it the prime IDE for C# developers on MacOS. Because of this, XS is discontinued and VS4Mac is the way to go. Awesome!

VS4Mac isn’t just a rebrand of XS, is has tons of new features added. When it was Xamarin Studio, you would be able to build apps, games & services for mobile using the technology from Xamarin. Now that it has turned into Visual Studio, you can even make Web and Cloud applications that you can deploy on Microsoft Azure. But that’s not all: VS4Mac also has C# 7.0 support! You’ll now be able to create stuff like Local functions and more of the great stuff C# 7.0 brings us (all running on Mono 5.0).

When creating a Native Mobile App in VS4Mac, you’ll now have the option to add a Mobile Backend, which adds a ASP.NET Core Web API project to the solution as well. You’ll get three different heads in the solution: The .Droid and .iOS projects (for Android and iOS respectively) and a new, .MobileAppService backend.

Visual Studio for Mac

The project template already comes with a small example to show you on how the projects work together. When running the .MobileAppService project, a web server will start on a certain port (in my example: 52599) which will cause Swagger UI to start up. And now the awesome part: VS4Mac supports Multi-process debugging as well! This means that you can debug the .iOS (or .Droid.) project and .MobileAppService project at the same time, jumping back and forth from front-end to back-end code.

By default, the Mobile projects use a MockDataStore that doesn’t make a connection to the .MobileAppService project. Luckily, it’s pretty simple to connect them to eachother and see the multi-process debugging in action. Take the following steps:

  1. Open up the App.cs file in the Shared project
  2. Set the UseMockDataStore boolean to false
  3. Make sure the BackendUrl has the correct port number

Now both the front- & back-end solutions are communicating with eachother, which you can simply prove by setting breakpoints in both solutions and checking the data. Now you’ll be able to create a full solution with a front- and back-end in the same IDE!

Visual Studio for Mac

In the example above you’ll see the ItemsViewModel , a class within the .iOS solution trying to retrieve the data. It jumps to the ItemController, a class within the .MobileAppService project to provide that data back to iOS. Being able to debug across these different threads allows developers to debug solutions quickly.

Other than an ASP.NET Web API, we’re also able to create a website with ASP.NET MVC or Web Forms. Since VS4Mac is running on Roslyn, syntax highlights for HTML and CSS is available. Even the Razor Syntax is supported, making VS4Mac your one-stop shop for Mobile and Web development as well!

Visual Studio for Mac

But it doesn’t stop there – there’s even support for Docker (in Preview) for those that like to play around with Containers. If you’re using Azure Functions to create a Serverless Architecture, you’re covered. If you’re a user of Unity, selecting a *.cs file now automatically opens up VS4Mac as well. With all this functionality already in VS4Mac, it doesn’t matter if you’re using Windows or MacOS!

As far as we know now, it won’t have an exact feature parity with Visual Studio on Windows. Developing UWP on MacOS wouldn’t make much sense as well as developing MacOS apps on Windows doesn’t make sense. But more and more functionality (especially Azure support) will be ported to VS4Mac soon, making it possible to have all the functionality you need to develop C# on MacOS. Go ahead and try it out yourself!

Related links:

Xamarin: UITest backdoor

When running your UI tests, locally or in Xamarin Test Cloud, you sometimes want to execute code in your app from your tests. You might for instance want to setup some mock implementations instead of making actual API calls, or you might want to trigger some OS specific code from your tests. In these scenario’s backdoors come in handy!

Backdoors itself are not very complex, but it opens up a lot of possibilities with UI tests. In the past I used backdoors to:

  • Setup authentication for tests
  • Create a specific state in your app to run your tests in.
  • Set mock implementations from my UI tests.
  • Trigger deeplink

And I can think of a lot more useful scenario’s. You can create a backdoor with the following code:

iOS
In your AppDelegate class you need to create an method that returns NSString, is public,  is annotated with Export attribute and takes an NSString as parameter. For example:

public class AppDelegate : UIApplicationDelegate
{
 [Export("myBackdoorMethod:")] // notice the colon at the end of the method name
 public NSString MyBackdoorMethod(NSString value)
 {
 // In through the backdoor - do some work.
 }
}

Android
On Android you need to create a method in your MainActivity that is public, returns string/void, is annotated with Export attribute and takes an string/int/bool as parameter:

public class MainActivity : Activity
{
    [Export("MyBackdoorMethod")]
    public void MyBackdoorMethod(string value)
    {
        // In through the backdoor - do some work.
    }
}

Invoking the backdoor from your UI tests:

if (app is Xamarin.UITest.iOS.iOSApp)
{
    app.Invoke("myBackdoorMethod:", "exampleString");
}
else
{
    app.Invoke("MyBackdoorMethod", "exampleString");
}

Note: The signature of the backdoor methods is very important as the Backdoors – Xamarin docs mention.

If you want to switch out your actual implementations for mocks, the use of compiler flags (combined with build configurations) might be more suited. You can read more on this over here.

Related links:

Build configurations and compiler flags

If you have developed some Xamarin applications in the past, you might have stumbled on the excessive range of configuration options you can choose from. The settings you’re using in development may be very different from your Release settings. For example; you don’t want to include debug information in the app that will be published to the App Stores. It will increase the app size enormously and expose technical info about your app that might be useful to malicious people.

Besides the difference of Release and Debug configurations, you sometimes need a extra set of configurations. Visual Studio allows you to create additional build configurations:

Configuration Manager

Configuration Manager

Build configurations

Build configurations

Compiler flags / Conditional compilation symbols

Per build configuration you can also specify a set of compiler flags. Compiler flags on itself don’t have any impact on your app, but you can use these flags in your code. By default the build configuration called Debug, has a compiler flag called “Debug”. In your code you can check if this flag is set (and therefor Debug configuration is active) and execute some Debug code. A common scenario is to Log additional information when the Debug flag is set.

Compiler flags

Setting compiler flags

Using compiler flag in code:

#if Debug
	InitializeUiTests();
#endif

Related links:

Xamarin: The magic of Fody weaving

When creating Xamarin apps a lot of people choose to go with the MVVM pattern. There are a lot of beautiful frameworks out there to make the life of an MVVM developer easier, but sometimes you just want to do it the hard way and write it yourself.

If you ever created an Xamarin app using the MVVM pattern (without any framework) and data binding, you may have noticed there is a lot of boilerplate code to notify property changes. As your ViewModels grow, this becomes a nightmare!

Fody.PropertyChanged to the rescue!
Fody is an extensible library that adds an post build task to the MSBuild pipeline. With this task it manipulates the generated IL code, depending on what add-ins you are using. Add-ins can be build on the Fody core. One of the add-ins is Fody.PropertyChanged. As you might guess, this add-in generates the code for notifying changes in a ViewModel. The add-in will look for properties in classes that implement INotifyPropertyChanged or properties/classes annotated with the [ImplementPropertyChanged] attribute.

Example class PersonViewModel:

[ImplementPropertyChanged]
public class PersonViewModel
{
public string GivenNames { get; set; }
public string FamilyName { get; set; }

public string FullName
{
get
{
return string.Format("{0} {1}", GivenNames, FamilyName);
}
}
}

After applying Fody magic it will become:

public class PersonViewModel : INotifyPropertyChanged
{
public event PropertyChangedEventHandler PropertyChanged;

string givenNames;
public string GivenNames
{
get { return givenNames; }
set
{
if (value != givenNames)
{
givenNames = value;
OnPropertyChanged("GivenNames");
OnPropertyChanged("FullName");
}
}
}

string familyName;
public string FamilyName
{
get { return familyName; }
set
{
if (value != familyName)
{
familyName = value;
OnPropertyChanged("FamilyName");
OnPropertyChanged("FullName");
}
}
}

public string FullName
{
get
{
return string.Format("{0} {1}", GivenNames, FamilyName);
}
}

public virtual void OnPropertyChanged(string propertyName)
{
var propertyChanged = PropertyChanged;
if (propertyChanged != null)
{
propertyChanged(this, new PropertyChangedEventArgs(propertyName));
}
}
}

Fody.PropertyChanged has another killer feature called Fody NotificationInterception which makes it possible to execute some code before propertyChanged gets triggered. This feature can be for example used for logging purpose or to make sure you are calling propertyChanged on the main thread. See related links for more info.

If you want to give Fody.PropertyChanged (or any other Fody add-in) a try, just install the NuGet package and you’re good to go!

Note:
Fody requires your release builds to contain debug symbols. You can enable this in your project settings by setting Build->compiler->debug information to “Symbols only”.

Fody-release

Related links: