Configuring coding conventions in Visual Studio

When developing software in a team it’s useful to have certain rules on how to write code. Consistency in your code will improve readability and maintainability. With EditorConfig you are able to enforce coding guidelines without having to install additional tools. It even works across IDE’s!

Visual Studio allows you to configure coding style rules. Based on this configuration, Visual Studio will suggest code improvements or show an error. Unfortunately there was no easy way to share this configuration with your team. This is why support for EditorConfig was added to Visual Studio 2017.

With EditorConfig you are able to specify code rules in a .editorconfig file. Visual Studio will automatically check if your code is meets the rules and show violations if it doesn’t. If you already have configured coding rules in your personal preferences, by default EditorConfig will override your rules. Adding your EditorConfig file to source control will allow you to easily share the configuration and have versioning for your guidelines. The configuration can be used for a wide variety of languages and IDE’s. For the IDE’s that are not supported out-of-the-box you can download a plug-in.

Support for EditorConfig is already available in Visual Studio for Windows, and is available in the latest preview of Visual Studio for Mac (7.5 Preview 5). Microsoft is still extending the support and the .NET community is working on EditorConfig to support more .NET features as well. If you want to contribute, please check out the website.

Getting Started

Visual Studio will look for a the .editorconfig in your solution. When a EditorConfig file was detected, Visual Studio will start enforcing the rules on the files at the same hierarchical level and below. This will allow you to override EditorConfig files if needed by adding configuration for different levels. If you want to use a single configuration for the entire solution, simply add “Root=true” to the configuration file. After editing your EditorConfig file, you need to reload your files for the new rules to take effect.

To simplify writing of your EditorConfig files there is the EditorConfig Language Service extension. This will improve IntelliSense, syntax highlighting, visualization and more. The EditorConfig from the Roslyn project might be a good starting point.

Related links

Creating intelligent apps with Computer Vision

After some experimenting with SkiaSharp, I came up with the idea to build a game like Draw It. Normally you draw something and someone needs to guess what you’ve drawn. This time I wanted to take a bit of a different approach. I wanted to draw something with SkiaSharp and put Computer Vision to the test!

Computer Vision is (a small) part of the Cognitive Services that Microsoft offers. The Cognitive Services allow developers without knowledge of machine learning to create intelligent applications. There are 5 different categories of cognitive services (at the moment of writing):

  • Vision: Image and video processing.
  • Knowledge: Mapping complex data to use for recommendations or semantic search.
  • Language: Process natural language to recognise sentiment and determine what users want.
  • Speech: Speaker recognition and real-time translation.
  • Search: More intelligent search engine.

The categories have a lot more to offer than described above. If you want to know more, please visit the Cognitive Services website. There is a 30-day trial available if you want to try it!

Computer Vision 

Computer Vision API is all about analysing images and videos. After sending an image or video, the API returns a broad set of metadata on the visual aspects of the file.  Besides telling you what’s in the picture, it can also tell who’s in the picture. Because it’s not trained to recognize everybody on this planet, this will only work with celebrities. If you’re not recognized by Computer Vision, it can still tell a lot about your picture. It will add tags, captions and even guess your age! It’s really fun to experiment with!

Computer Vision also supports Optical Character Recognition (OCR) what can be used to read text from images. OCR is very useful when you’re building apps that need to interpret paper documents. Handwritten text are still in preview.

If you want to test if Computer Vision suits your needs, you can give it a try on the website without having to code a single line. This demo will only work for basic scenarios (upload an image), if you want to use the more advanced features (like real-time video), I’d suggest you try the API directly.

Getting started

Using Cognitive Services is pretty straightforward because all of the magic is available through REST API’s. For this post I will focus on the Computer Vision API, but the other APIs work in a similar way. You can use the API’s with the following steps:

  1. To start using Cognitive Services you can create a trial account on the website. Click the “Try Cognitive Services for free” button and then click “Get API Key” for the Computer Vision API. After signing in with your account you will get an API key that allows you to create 5000 transactions, limited to 20 per minute. Note: the trial is limited to the westcentralus API (https://westcentralus.api.cognitive.microsoft.com/vision/v1.0).
    If you want to implement Cognitive Service in your production environment, you can obtain an API key from the Azure Portal. Therefor you need to create an Cognitive Services resource of the type you want to use (for example: Computer Vision API). When the resource is created, you can get your keys from the Quick Start -> Keys.
  2. Because Computer Vision is exposed as an REST API, you can call it from your app using HttpClient. Instead of creating your HttpClient, you can also use the NuGet package to make your calls to the Computer Vision API.
    Note: In most cases you don’t want to make the calls directly from your app, but call the Cognitive Services from your server. This will prevent users from stealing your API key (and burning your Azure credits) when they decompile your app or intercept your calls.
  3. After adding the Microsoft.ProjectOxford.Vision to your backend or frontend, you will be able to use Computer Vision with a few lines of code:
    // If you're using a trial, make sure to pass the westcentralus api base URL
    var visionClient = new VisionServiceClient(API_Key, "https://westcentralus.api.cognitive.microsoft.com/vision/v1.0");
    VisualFeature[] features = { VisualFeature.Tags, VisualFeature.Categories, VisualFeature.Description, VisualFeature.ImageType, VisualFeature. };
    var result = await visionClient.AnalyzeImageAsync(stream, features.ToList(), null); 

    First we create an VisionServiceClient object with an API key and a base URL. Trial keys only work with the WestCentralUS instance and therefor I’m also passing the BaseUrl. When you’ve created a client, you can call AnalyzeImageAsync. This function takes in a Stream (which contains the image) and a list of VisualFeatures. The VisualFeatures specify what you want Computer Vision to analyse. If you prefer to use the HttpClient instead of the NuGet package, I’d recommend the video where René Ruppert explains how to use HttpClient to consume Cognitive Services.

Results

Unfortunately my drawing skills are not good enough for Computer Vision to recognise (with great certainty) what I was drawing. Although it was not sure what I was drawing, it suggested “Outdoor house” with a accuracy of 0.1875. An other tag Computer Vision suggested was “Clock” and I think that’s because the sun looks like a clock.

If you want to give your drawing skills a shot, the code of my experiment is on GitHub. For the drawing part of the application I’ve used some code snippets from the Xamarin.Forms samples. Besides this sample app, Xamarin has a lot of great sample apps on their GitHub.

If you want to learn more about the Computer Vision API or Cognitive Service, make sure to check out the related links below. If you have any questions or suggestions, please don’t hesitate to contact me on Twitter.

Related links:


HockeyApp: Creating a bridge to the cloud

HockeyApp is an awesome tool when it comes to crash reporting, user metrics, beta app distribution and collecting user feedback. The SDK is very easy to integrate and there also is tooling available to integrate HockeyApp in your CI/CD pipeline.

In 2016, when Microsoft announced (Visual Studio) Mobile Center, it also became clear that HockeyApp will become part of this new full-fledged platform for mobile development. Therefor Microsoft is now focussing on integrating HockeyApp in Mobile Center and HockeyApp itself isn’t getting new features.

If you are currently at the point where you need to choose a tool for crash reporting and user metrics, and you don’t want to use the preview of Mobile Center, HockeyApp is probably still the way to go. One great advantage of HockeyApp is that when Mobile Center becomes general available, the migration will be seamless. Also if you want to analyze and visualize your event data in ways other than are currently available in HockeyApp, you are able to create a bridge to Azure Application Insights. This will allow you to create your own dashboards and get fine-grained control of your data and metrics. You can even export to your own data storage through Application Insights! For now it’s only possible to export events and traces, but exporting crashes is on the roadmap for Mobile Center.

Application Insights
Application Insights is an extensible analytics platform that helps you monitoring your performance and metrics. When connecting HockeyApp to Azure Application Insights the raw data of logged events and traces will become available for querying. Based on these queries you’ll be able to create your own dashboards!

Setting up the connection between HockeyApp and Application Insights is pretty straightforward:

  1. First, create a API in your HockeyApp account settings:
  2. When the API key is created, you need to create a resource in the Azure portal. The Application Insights resource can be found in the Developer Tools category. After selecting Application Insights, the form will show up and ASP.net web application will be selected as default application type. After selecting “HockeyApp bridge app”, the form will change and show the required fields for a HockeyApp bridge. First of all you need to paste the (previously created) API key in the “Token” field. Azure will automatically load your apps from HockeyApp, so you only have to choose an app and fill in the other fields. If you ever created an Azure resource this should be fairly easy.
  3. After clicking Create, you’re all set! Yes, it’s really that easy!
    To see your data you can simply open Application Insights from the Azure portal or navigate directly to https://analytics.applicationinsights.io/ and log in with your Microsoft account.

When your bridge app collected some data, you will be able to start analyzing and visualizing by creating queries. Queries can be created with the Analytics query language, which might be a bit tricky in the beginning, but the documentation will help you get started. To give you a feeling of what it looks like, this query will return all events from the US:

 customEvents | where client_CountryOrRegion == "United States" 

By default the data is visualized in a table, but with a few clicks you can transform this into a beautiful chart. You can even customize these visualizations to suit your needs!

Related links:

Microsoft Build: The future of Xamarin

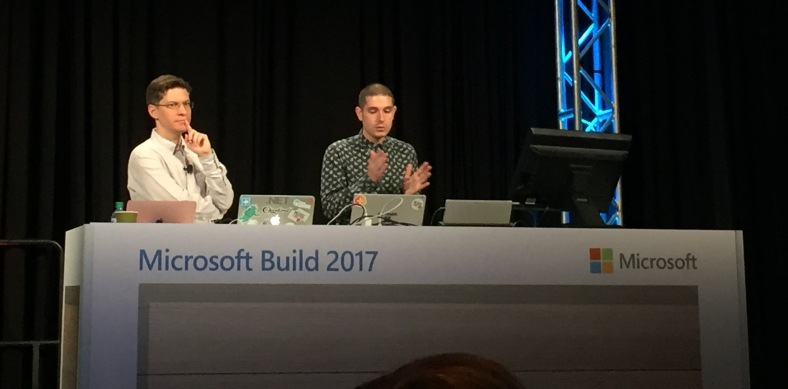
On the second day of the Microsoft Build conference, during the Keynote, Microsoft had some awesome announcements related to Mobile development. In a following session James Montemagno and Miguel De Icaza got into more detail and even showed more epic new features. As always to two put on a great show while presenting!

Together with my colleague Marco, I’ll cover announcements made at the Microsoft Build conference in a series of blogposts. You can also read these posts on his blog.

Xamarin Live Player
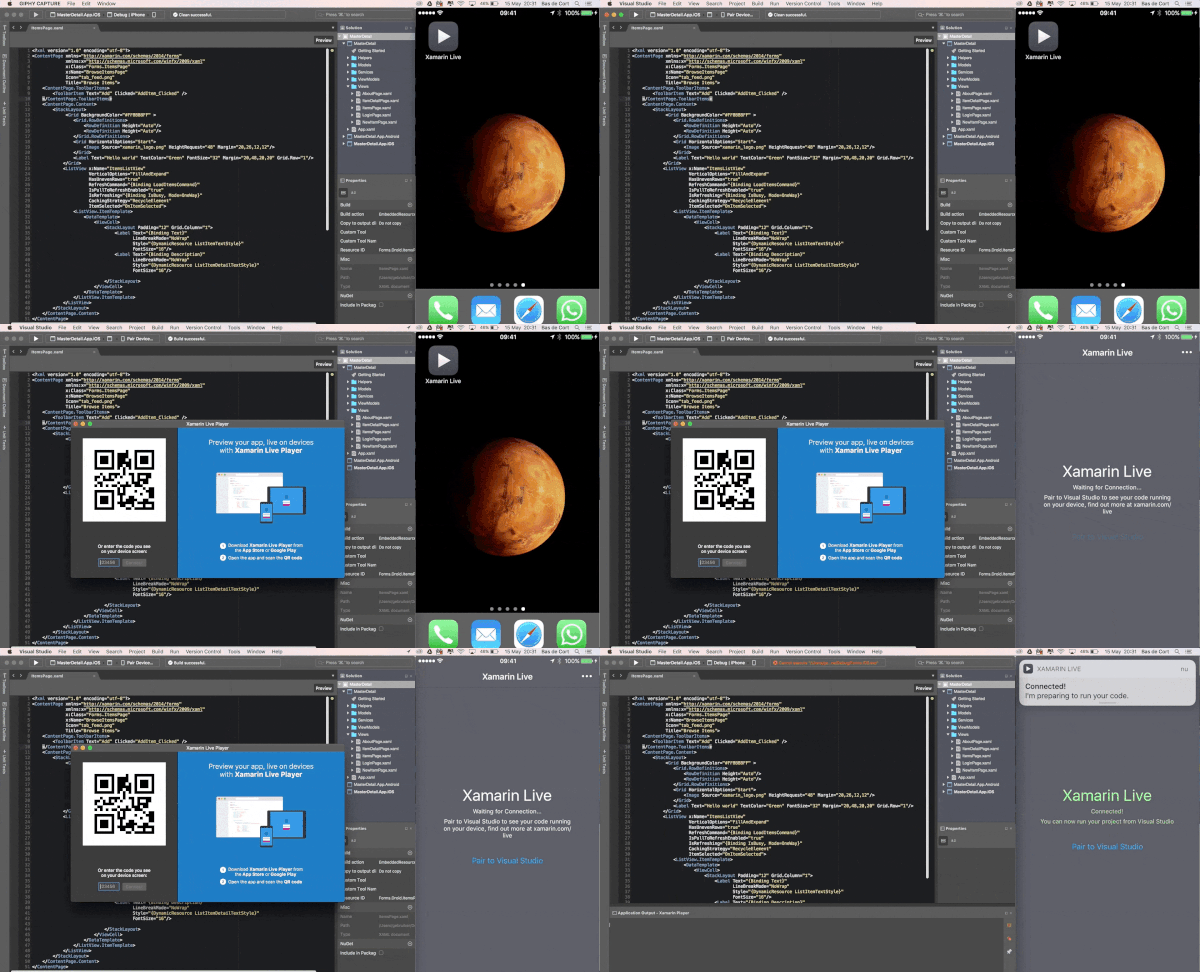
When Xamarin Live Player (XLP) was announced during the Build keynote, most of the audience was pleasantly surprised. Until now developing on Windows for iOS was a serious hassle because it required a Mac to compile the app. This setup works well when you have an expensive Mac and a fast and reliable network, but in a lot of scenarios these builds take up a lot of time.

With XLP you don’t need a Mac build host anymore! You just install the Xamarin Live Player app from the App Store or Play Store, pair your device in Visual Studio and boom! You’re ready to debug on the device. Just select your device (annotated with “Player”) en hit run:
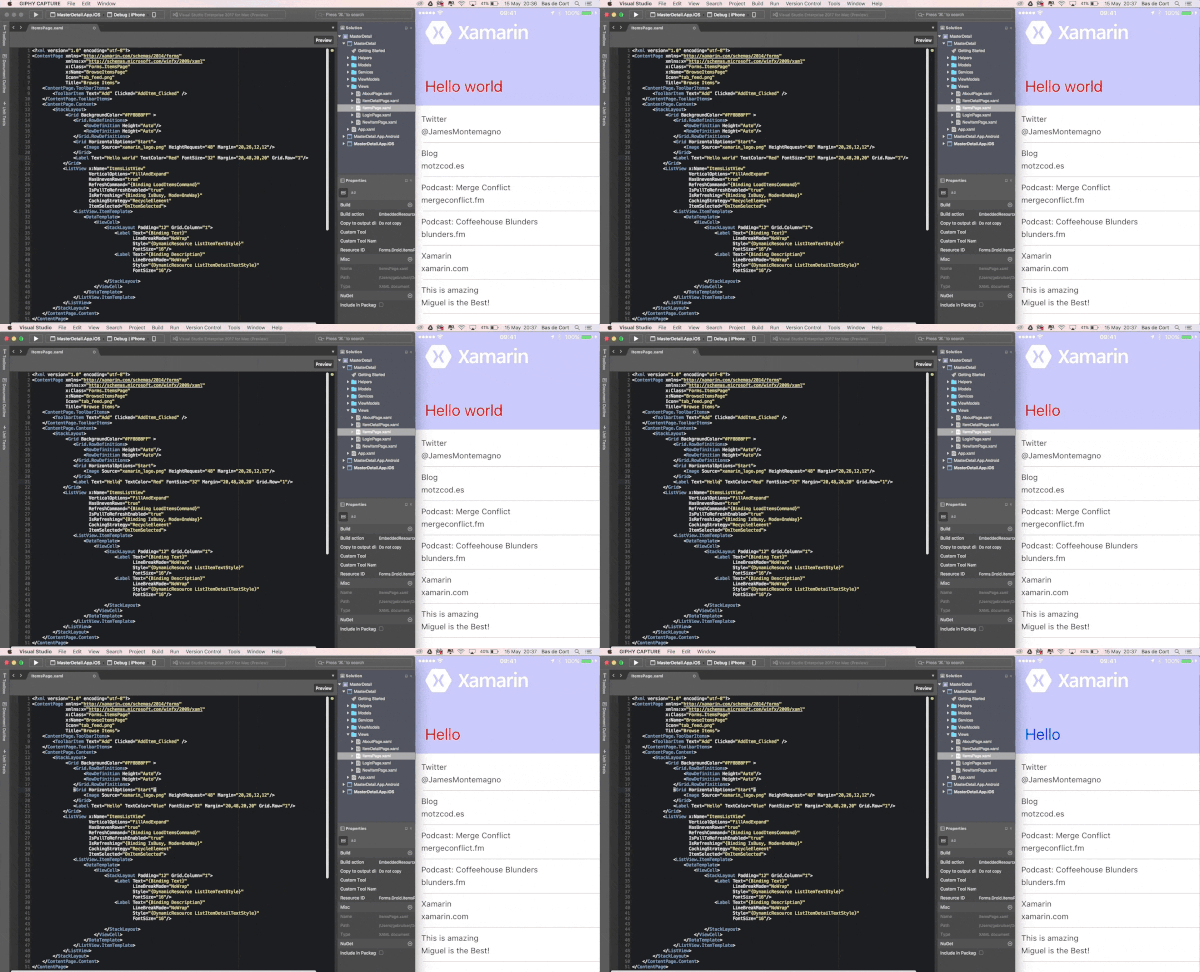
Besides the build improvements XLP has more to offer! You can also modify your Xamarin.Forms or Xamarin.Classic app while debugging so you can easily test changes to your app without stopping and restarting the debug process.
This will really speed up the development! To achieve this you first have to open the view you want to debug live. For now a Xamarin.Forms Xaml and iOS storyboards are supported, when XLP becomes GA all types of views should be supported. After opening your view file, you can run the with Visual Studio by clicking “Run -> Live Run Current View” on Mac or “Tools -> Xamarin Live Player -> Live Run Current View” on Windows.

XLP is still in preview and after some testing we are still experiencing a few difficulties. If you want to give XLP a try, you’re probably best of using the examples provided by James Montemagno.
Fastlane
If you’ve ever developed an app for iOS you probably felt the pain of having to provision your app in the Apple Developer Portal. Although there is a good (and very long) read on how to accomplish this, you don’t want to waste any time on this. This is where Fastlane comes to the rescue. With Fastlane tools installed you are able to provision your app with a few clicks in Visual Studio! Fastlane also comes in handy when releasing your app to the Stores. It handles all tedious tasks, like generating screenshots, dealing with code signing, and releasing your application.

Xaml standard 1.0
During the Build Conference Microsoft also introduced a new standard for XAML, called XAML Standard 1.0. The standard will describe a specification for cross-platform user interfaces for both UWP and Xamarin.Forms. As for now, XAML Standard is in a very early stage and Microsoft encourages developers to contribute to their specification. 1.0 should become available later this year.

Bindings simplified
Xamarin was already supporting usage of native libraries with Android binding and iOS binding projects. Because of the complex nature of binding projects, Xamarin released the CocoaPods Importer which will simplify importing CocoaPods with a few clicks. With this importer you can easily transform a CocoaPods library to a .NET library.

iOS Extensions
When you’ve created extensions for your app, these extensions will run in a separate process. Therefor the Xamarin runtime was included for every extension. With the latest version of Xamarin, the runtime is only included once for all your extensions. This will result in a smaller app size and improved performance. The latest version of Visual Studio also allows multi-process debugging, that will come in handy when debugging your app combined with your extensions.

AOT for Mac and Android, Hybrid mode
The compilation process of Xamarin.Android and Xamarin.iOS apps was quite different until now. One big difference was that Android was compiled Just In Time, iOS was compiled Ahead Of Time. After the compilation of iOS apps, the LVVM optimizes the generated code to get high performance. Xamarin announced to also start supporting AOT for Android and Mac apps, that will result in better performance. When you compile AOT you might lose some flexibility (for example: no dynamic code loading), and therefor Xamarin also introduced an Hybrid mode. The Hybrid mode will work for platforms that support AOT as well as JIT. It will compile AOT, but also add the bits needed for JIT.

Embedinator-4000

Embedinator-4000​
While the Xamarin platform mostly focuses on writing code in C# and compiling this to a native application, the Embedinator takes a bit of a different approach. The Embedinator makes it possible to write your code in C# and then compile this into a framework library for Java, Swift, Objective-C or C/C++. Therefor you can easily share your C# code with truly native apps. Miguel De Icaza promised that more languages will be added. As for now, the Embedinator can be used from command line, in the future this will be integrated in Visual Studio.

SkiaSharp
SkiaSharp is a cross-platform 2D graphics API for .NET platforms based on Google’s Skia Graphics Library (which is used by apps like Google Chrome). Xamarin announced that it will be supporting Android, iOS, Mac, UWP, tvOS and Windows. Also support for SVG files is added in the latest release. James showed an awesome demo of The Kimono designer which is build on top of SkiaSharp.

Xamarin.IoT
The latest alpha of Xamarin also contains support for Linux based IoT devices! It will add a new project template for Xamarin.IoT and allow you to deploy and debug your IoT app remotely. Debugging will work similar to debugging Xamarin applications. The IoT Hub SDK will make it easy to communicate with your Azure IoT Hub. The library supports communication with MQTT and AMQP message queues.

Mobile Center
Microsoft is putting a lot of effort in making Mobile Center a full fletched CI/CD solution. With the latest release they added support for UWP and the ability to send push notifications to Android or iOS applications. Mobile Center is still in preview, but is expected to become GA later this year.

Project Rome for iOS
Last year Microsoft announced Project Rome SDK for Android. This year at the Build conference Microsoft also announced the iOS SDK. Project Rome creates a bridge between the different platforms for a seamless user experience. The SDK allows developers to start and control apps over platforms and devices.

If you have any comments or want to share your experience, don’t hesitate to contact me on Twitter.

Related links:


Microsoft Build: VS4Mac

Last week I travelled to Seattle to attend the Microsoft Build conference. On the first day of the conference there were a lot of cool announcements related to AI, IoT, Azure and more, but Xamarin wasn’t mentioned at all. Slightly related to Xamarin development was the release of Visual Studio for Mac.

Together with my colleague Marco, I’ll cover announcements made at the Microsoft Build conference in a series of blogpost. You can also read these posts on his blog.

In november Microsoft announced the availability of Visual Studio for Mac (VS4Mac) at Microsoft Connect();-event. In the beginning, MonoDevelop was the IDE to develop C# on a Mac, which later converted to Xamarin Studio (XS). But since the Build-conference this week, VS4Mac has gone GA which made it the prime IDE for C# developers on MacOS. Because of this, XS is discontinued and VS4Mac is the way to go. Awesome!

VS4Mac isn’t just a rebrand of XS, is has tons of new features added. When it was Xamarin Studio, you would be able to build apps, games & services for mobile using the technology from Xamarin. Now that it has turned into Visual Studio, you can even make Web and Cloud applications that you can deploy on Microsoft Azure. But that’s not all: VS4Mac also has C# 7.0 support! You’ll now be able to create stuff like Local functions and more of the great stuff C# 7.0 brings us (all running on Mono 5.0).

When creating a Native Mobile App in VS4Mac, you’ll now have the option to add a Mobile Backend, which adds a ASP.NET Core Web API project to the solution as well. You’ll get three different heads in the solution: The .Droid and .iOS projects (for Android and iOS respectively) and a new, .MobileAppService backend.

Visual Studio for Mac

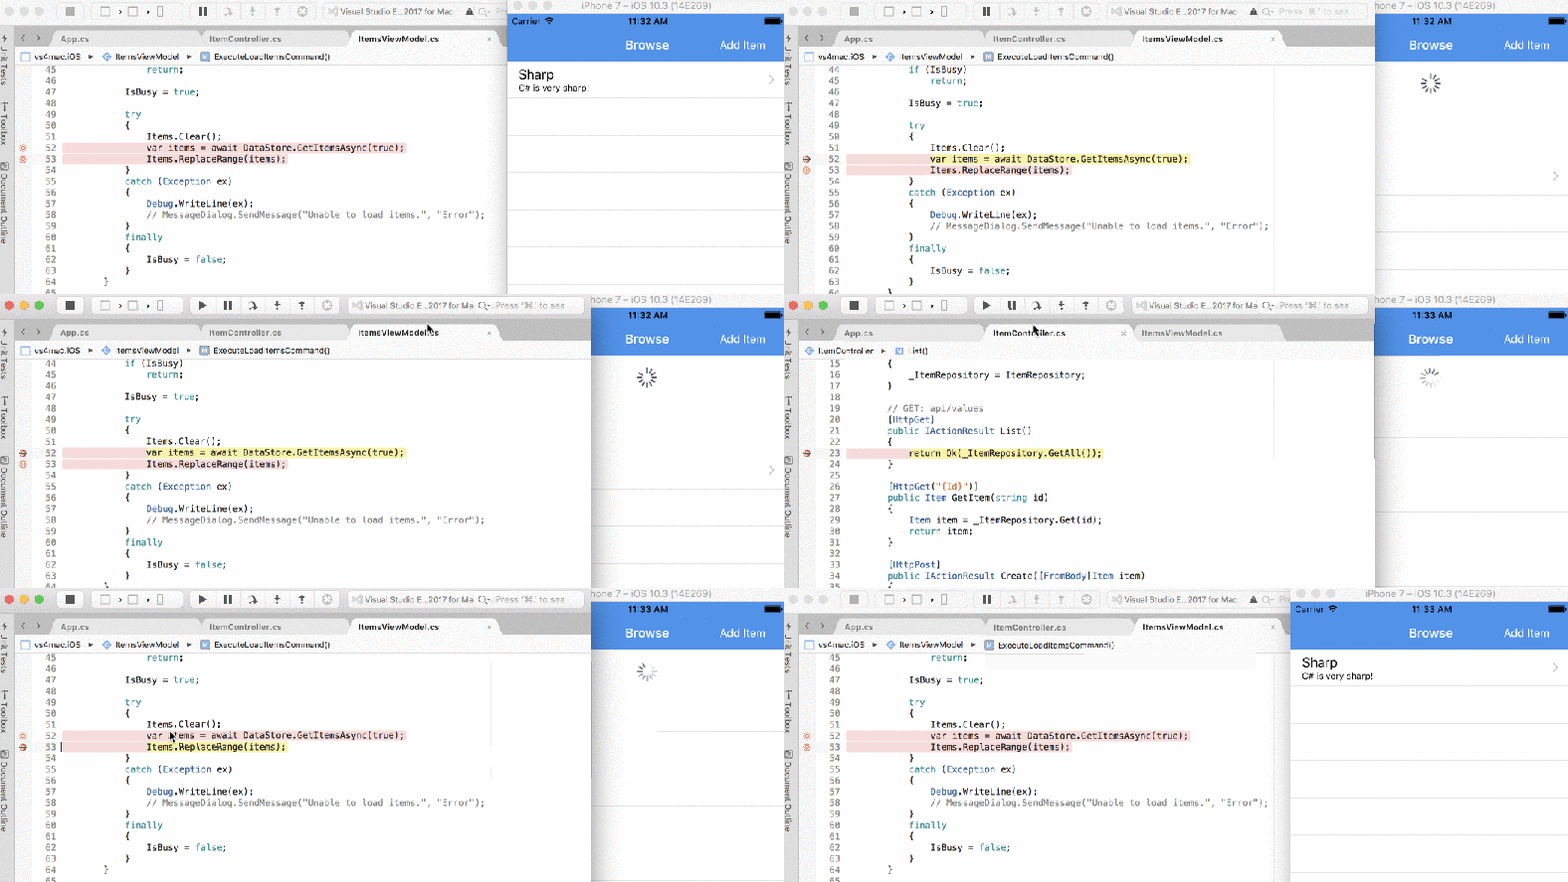
The project template already comes with a small example to show you on how the projects work together. When running the .MobileAppService project, a web server will start on a certain port (in my example: 52599) which will cause Swagger UI to start up. And now the awesome part: VS4Mac supports Multi-process debugging as well! This means that you can debug the .iOS (or .Droid.) project and .MobileAppService project at the same time, jumping back and forth from front-end to back-end code.

By default, the Mobile projects use a MockDataStore that doesn’t make a connection to the .MobileAppService project. Luckily, it’s pretty simple to connect them to eachother and see the multi-process debugging in action. Take the following steps:

  1. Open up the App.cs file in the Shared project
  2. Set the UseMockDataStore boolean to false
  3. Make sure the BackendUrl has the correct port number

Now both the front- & back-end solutions are communicating with eachother, which you can simply prove by setting breakpoints in both solutions and checking the data. Now you’ll be able to create a full solution with a front- and back-end in the same IDE!

Visual Studio for Mac

In the example above you’ll see the ItemsViewModel , a class within the .iOS solution trying to retrieve the data. It jumps to the ItemController, a class within the .MobileAppService project to provide that data back to iOS. Being able to debug across these different threads allows developers to debug solutions quickly.

Other than an ASP.NET Web API, we’re also able to create a website with ASP.NET MVC or Web Forms. Since VS4Mac is running on Roslyn, syntax highlights for HTML and CSS is available. Even the Razor Syntax is supported, making VS4Mac your one-stop shop for Mobile and Web development as well!

Visual Studio for Mac

But it doesn’t stop there – there’s even support for Docker (in Preview) for those that like to play around with Containers. If you’re using Azure Functions to create a Serverless Architecture, you’re covered. If you’re a user of Unity, selecting a *.cs file now automatically opens up VS4Mac as well. With all this functionality already in VS4Mac, it doesn’t matter if you’re using Windows or MacOS!

As far as we know now, it won’t have an exact feature parity with Visual Studio on Windows. Developing UWP on MacOS wouldn’t make much sense as well as developing MacOS apps on Windows doesn’t make sense. But more and more functionality (especially Azure support) will be ported to VS4Mac soon, making it possible to have all the functionality you need to develop C# on MacOS. Go ahead and try it out yourself!

Related links: